


Home » How to Integrate Your Mobile App With a Payment Gateway
How to Integrate Your Mobile App With a Payment Gateway
| September 1, 2026
Integrating a payment gateway into a mobile app requires more than adding a checkout screen and connecting an API. You need to decide where payment data is collected, what happens in the app versus on your backend, how transactions are authenticated, and how your system handles failures, retries, refunds, and payment status updates.
But that’s well worth the effort. Customers can pay without leaving the app, you can support multiple payment methods, and your business can automate much of the payment authorization and transaction-management process behind the scenes.
However, those benefits depend on getting the integration right.
This guide explains how to integrate your mobile app with a payment gateway step by step, from choosing a provider and obtaining API credentials to tokenization, webhooks, testing, compliance, and production monitoring.
QUICK TAKEAWAYS
- A secure mobile payment integration keeps sensitive payment data and secret credentials out of the app and relies on tokenization plus server-side processing.
- The best payment gateway should match your app’s payment methods, target markets, scalability needs, development stack, and business model.
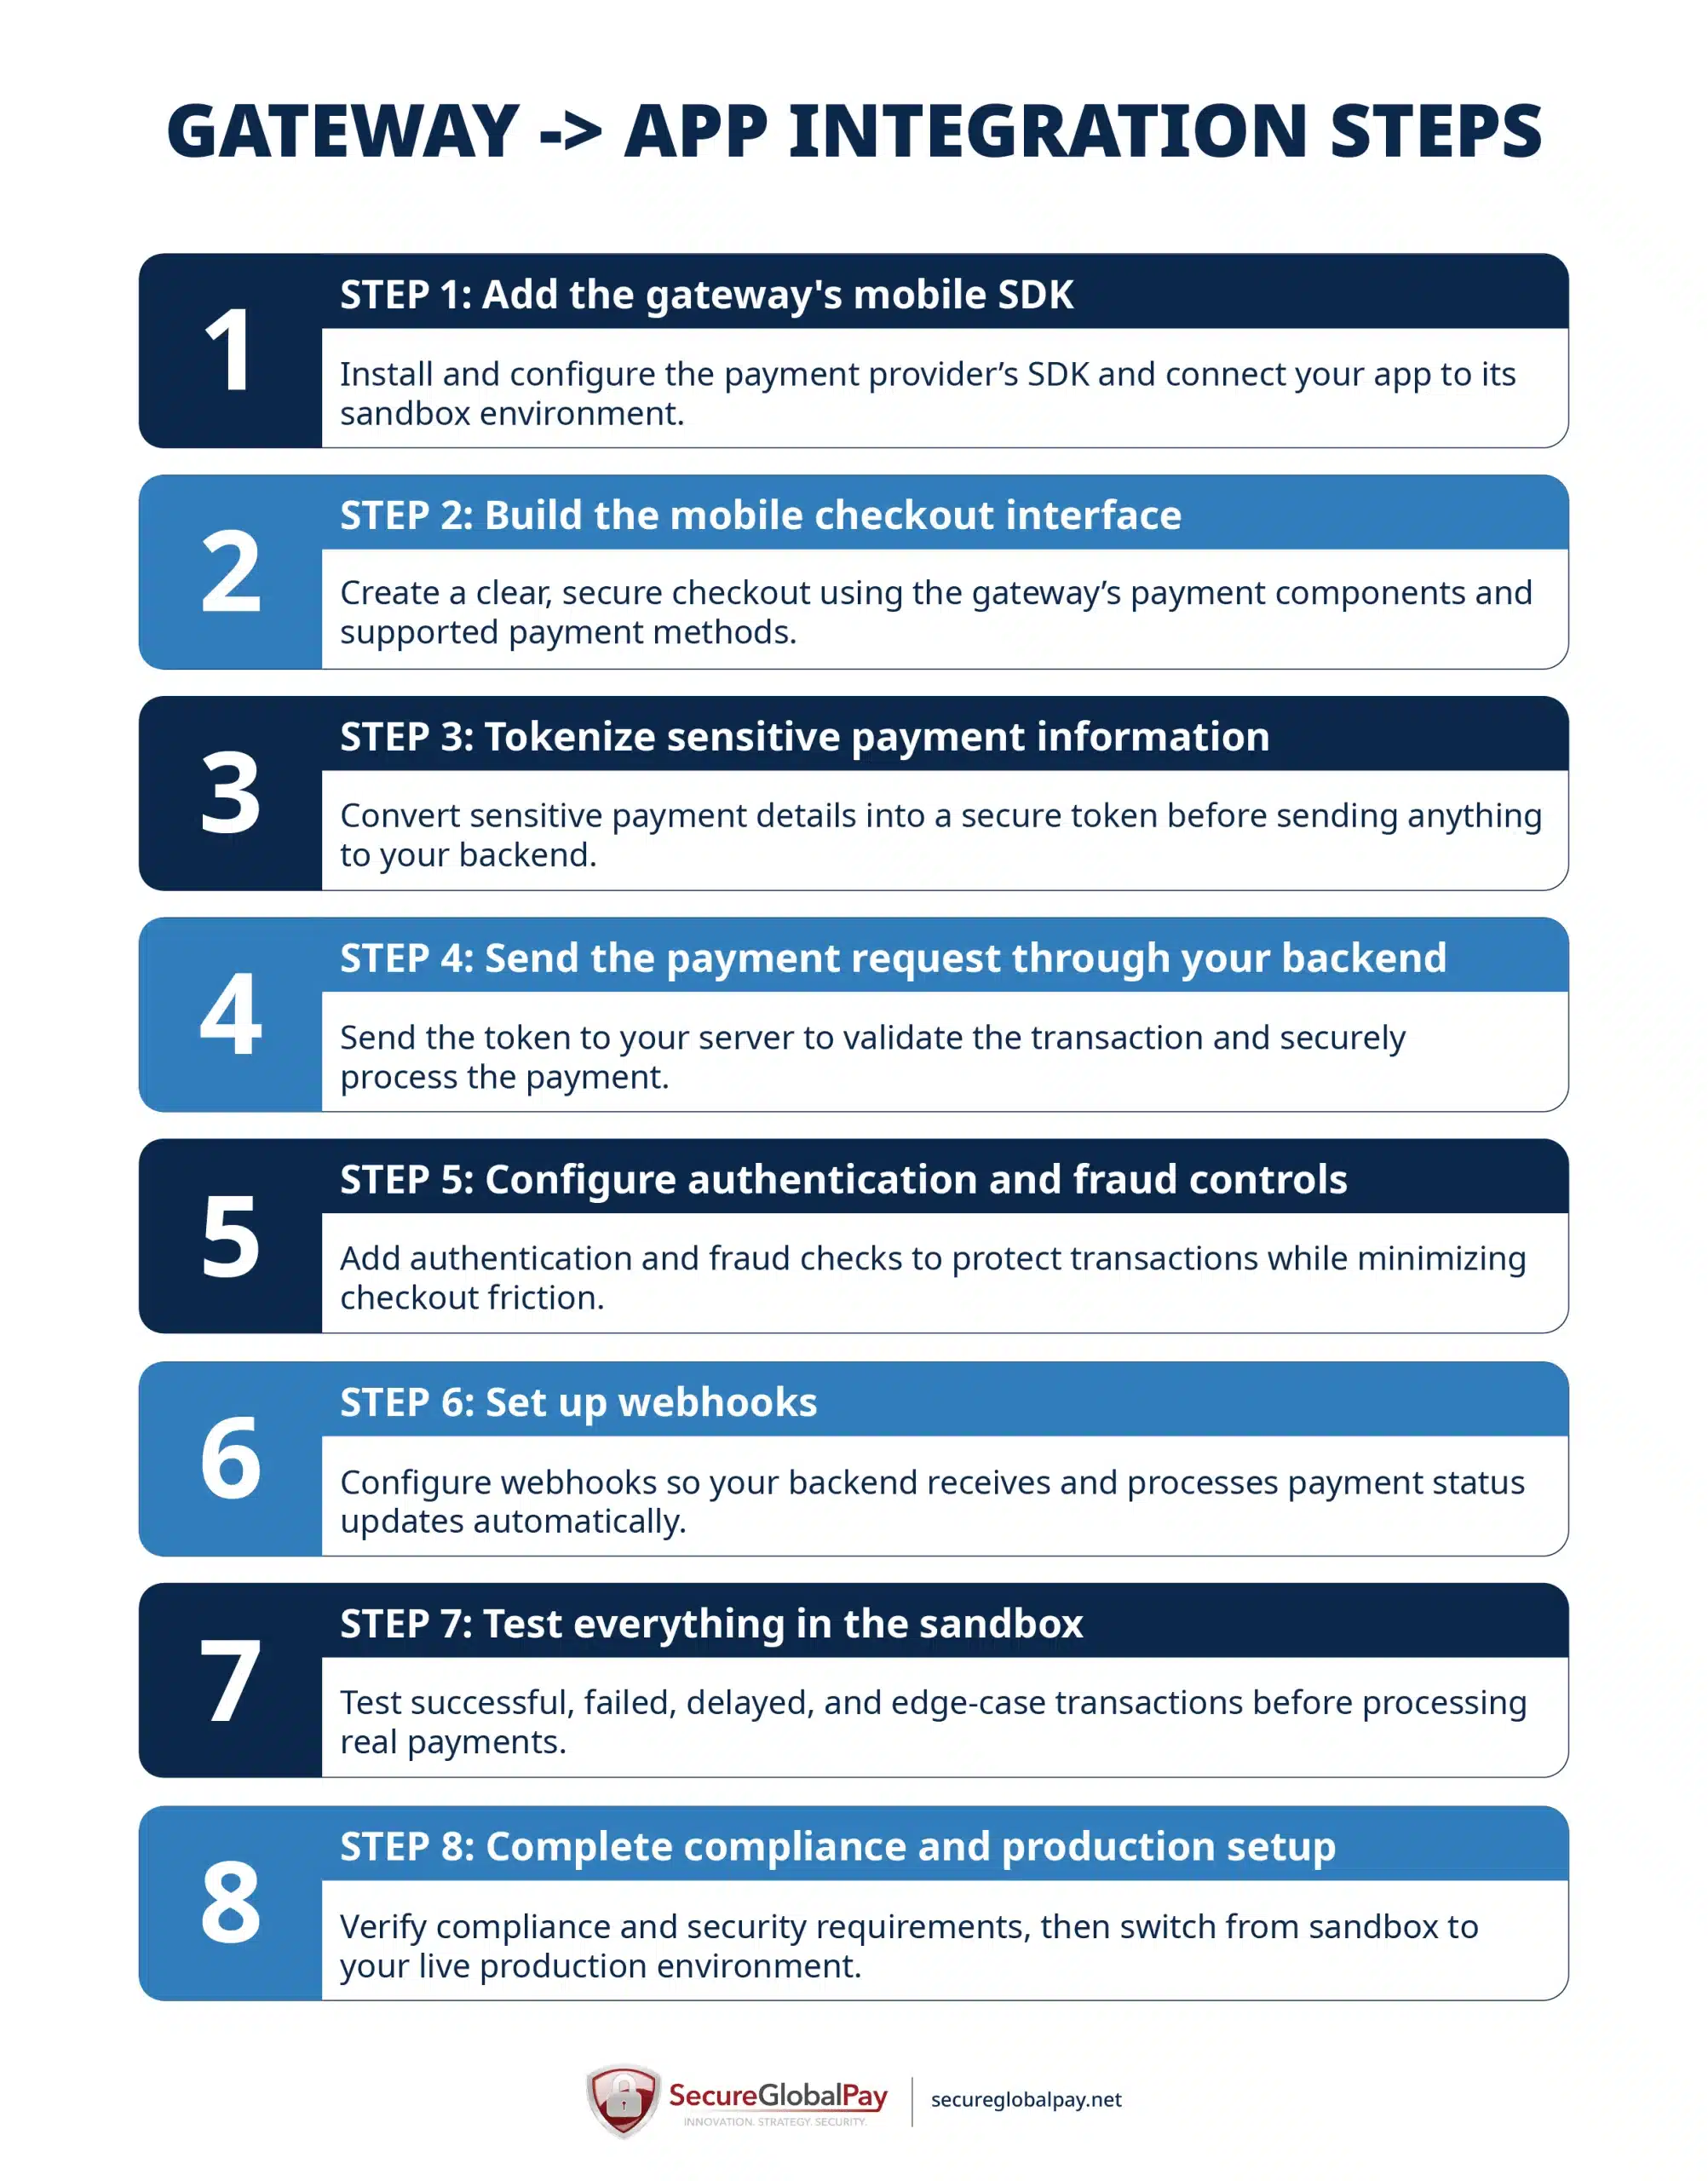
- Most integrations follow the same core flow: add the SDK, build checkout, tokenize payment data, process payments through the backend, configure webhooks, and test thoroughly.
- Idempotency, webhook handling, and payment-state synchronization are critical for preventing duplicate charges and incorrect order statuses.
- PCI DSS requirements and Apple App Store or Google Play billing rules should shape your payment architecture before development starts.
How to choose the best payment gateway for your mobile app?
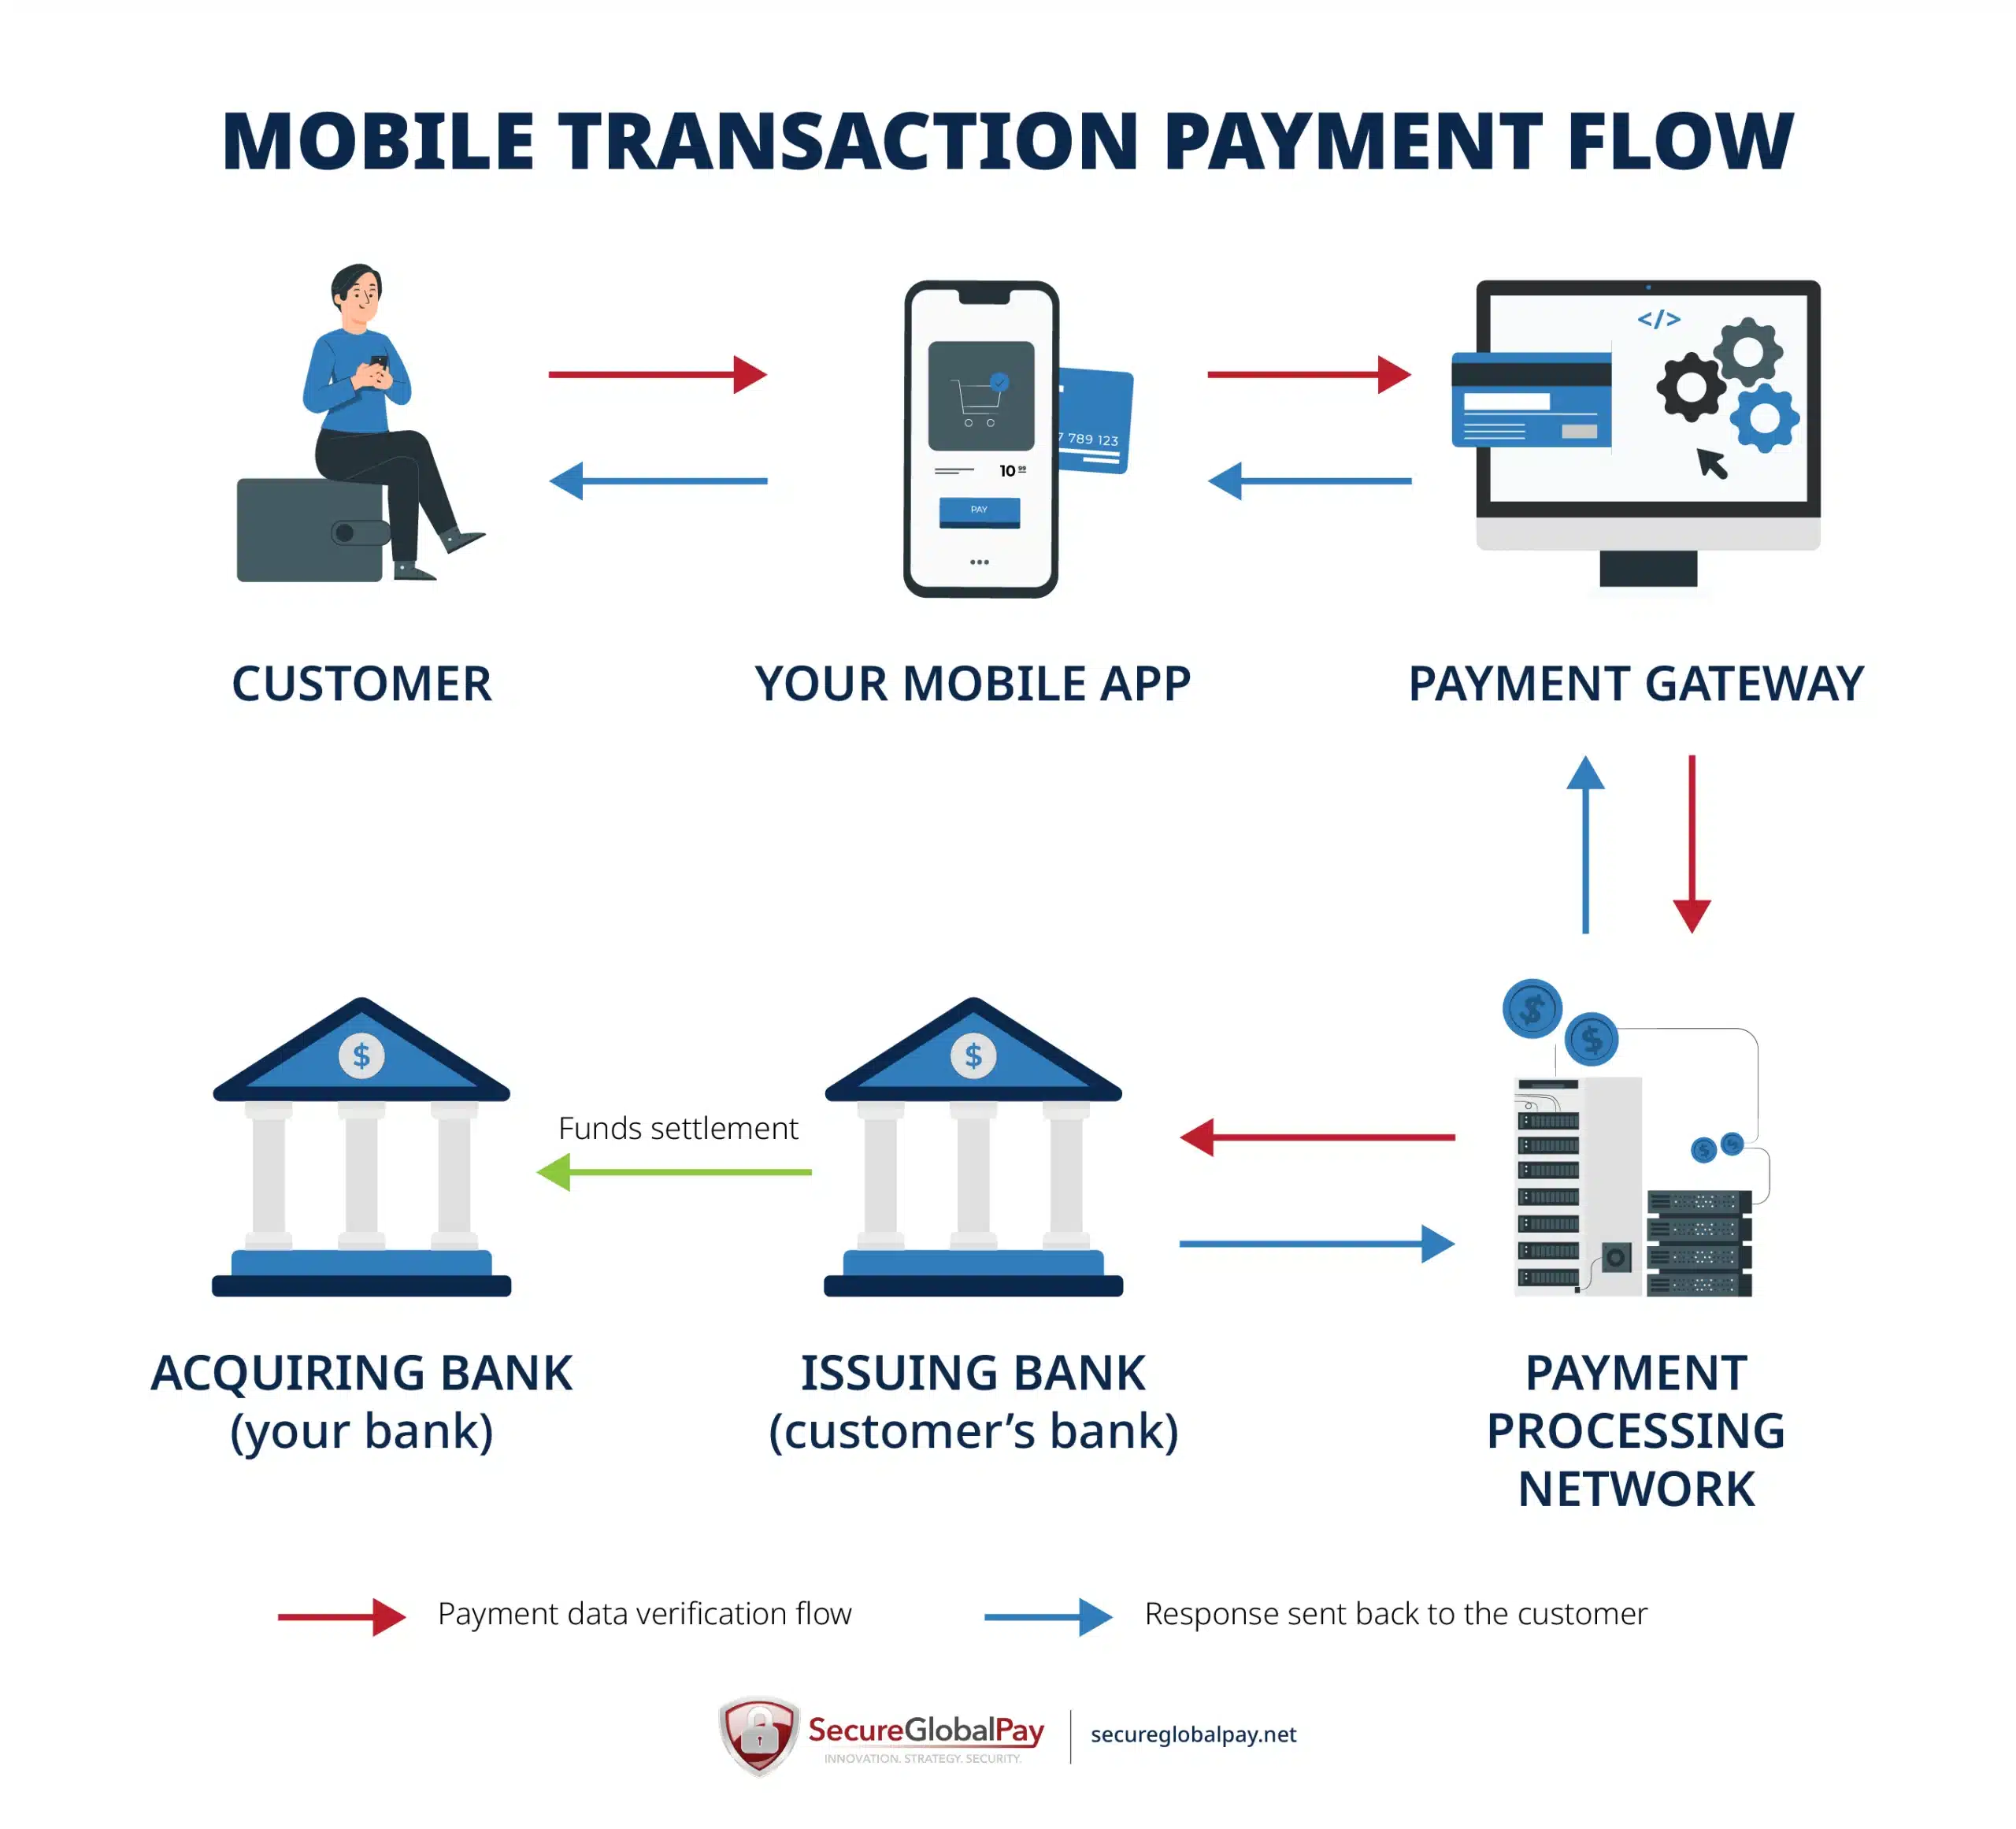
A payment gateway acts as the secure communication layer between your app and the payment-processing infrastructure: it receives or tokenizes payment information, passes the transaction toward the processor or acquiring bank, and returns the authorization result to your backend and app.
Things to look for in a payment gateway
Nowadays, there are quite a few gateways to choose from. You’ll want a provider that fits your app architecture, customers, business model, and growth plans. Be sure to evaluate the following factors:
- Security and compliance: Look for PCI DSS-compliant infrastructure, encryption, tokenization, 3D Secure 2, strong authentication options, and built-in fraud controls. Ideally, the gateway’s mobile SDK or payment component should tokenize card details before they reach your backend.
- Supported payment methods: Start with the methods your customers actually want to use. Depending on your market, that may include credit and debit cards, Apple Pay, Google Pay, PayPal, bank payments, BNPL, or local payment methods. Check mobile-specific support because a provider may offer a payment method through its web checkout without supporting the same flow through its native mobile tooling.
- Supported currencies and geographic locations: Confirm where the provider can onboard your business, which currencies it can process and settle, and which payment methods are available in each target country. These are separate questions — a gateway may technically support a currency without supporting merchant accounts or every local payment method in that market.
- Scalability: Think beyond your current transaction volume. Check whether the gateway can support saved payment methods, subscriptions, multi-MID setup, international payments, and any marketplace or multi-party payment flows you may add later.
- Integration complexity and developer support: Review the provider’s iOS, Android, Flutter, and React Native support, API documentation, sandbox, webhooks, error documentation, and technical support. Prebuilt interfaces such as Stripe Payment Sheet, Square’s In-App Payments SDK, or Adyen Drop-in can shorten development, while lower-level API integrations provide more control but require more engineering work.
- Pricing model: Compare your estimated total processing cost, not just the headline percentage. Depending on the provider and account structure, costs can include per-transaction fees, gateway fees, monthly fees, cross-border fees, currency conversion, chargeback fees, additional fraud tools, or custom rates based on volume and risk. If your business requires a dedicated high-risk merchant account, pricing may be determined during underwriting rather than published as a standard flat rate.
Comparison of popular payment gateways for mobile app integration
There is no universally best solution. For example, Stripe emphasizes streamlined developer tooling, while Adyen provides more extensive configuration for complex international payments. SecureGlobalPay takes a different approach by pairing payment gateway capabilities with merchant account services and providing more hands-on support during integration.
| Provider | Best for | Top pros | Potential limitations |
|---|---|---|---|
Stripe | Developer-led startups, SaaS, marketplaces, and general e-commerce apps | Mature mobile tooling; Payment Sheet for iOS, Android, and React Native; extensive payment-method support; strong documentation | Some advanced flows require considerable backend configuration; merchant and payment-method availability varies by country and business type |
| Square | SMBs and companies combining mobile, online, and in-person payments | In-App Payments SDK for iOS and Android plus Flutter and React Native plugins; customizable checkout; secure tokenization | A backend is still required to complete payments; geographic availability is more limited than some globally focused platforms |
| Braintree | Apps that want PayPal alongside cards, wallets, vaulting, and custom payment flows | PayPal ecosystem integration; dedicated iOS and Android SDKs; flexible client/server architecture | Braintree’s Drop-in SDK enters deprecated status on September 1, 2026, so new integrations should use the current Braintree SDK approach |
| Authorize.net | Established U.S. businesses already using Authorize.net or a compatible merchant account | Accept Mobile SDKs for iOS and Android; Apple Pay and Google Pay support; secure payment nonce keeps raw card details away from your backend | Mobile tooling requires more manual API work than some newer prebuilt checkout solutions |
| SecureGlobalPay | Businesses in high-risk verticals that need a merchant account alongside the gateway and want hands-on dev support | Accept Mobile SDKs for iOS and Android; support for Apple Pay and Google Pay; 3DS2; built-in fraud tools; raw card details kept away from your backend; multi-currency and multi-MID capabilities with smart payment routing | Less self-service than an aggregator; underwriting can add steps before development moves to production |
| Adyen | Large, international businesses with complex payment requirements | Native and cross-platform support; Drop-in, Components, and API-only options; broad payment-method support; 3DS2 | Extensive capabilities and configuration can be unnecessary for a simple mobile checkout |
| SecurePay | Australian and New Zealand businesses that want locally focused payment infrastructure | REST APIs; Apple Pay and Google Pay; 3DS2; fraud protection; access to multiple local acquirers | Primarily focused on Australia and New Zealand; current public developer tooling emphasizes REST, JavaScript, and React rather than dedicated native mobile SDKs |
Make sure your business model is part of the technical decision. An easy-to-integrate gateway is not useful if the provider will not support your industry, transaction profile, or target markets.
For example, a subscription-based fitness app may need recurring billing support and global card acceptance, while a high-risk online gaming app may require a gateway that supports high-risk merchant accounts and advanced fraud screening.
Steps for integrating a mobile app with a payment gateway
Mobile payment gateway integration usually involves two connected pieces: a client-side integration that securely collects payment information in the app and a server-side integration that creates payments, communicates with the gateway, and tracks transaction status.
Before your developers start implementing the payment flow, you’ll need to choose a payment gateway and processor, obtain merchant account approval, and obtain API credentials. You will typically receive separate sandbox and production credentials.
If your app sells digital goods, subscriptions, or other content consumed inside the app, also verify the current Apple App Store and Google Play payment rules before choosing your payment architecture. Those rules can determine whether you can use an external payment gateway for a particular transaction.
Step 1: Add the gateway’s mobile SDK
The first development step is to add the payment provider’s software development kit (SDK) or supported mobile library to your app. The exact installation process depends on the provider and your development framework, but your team will generally need to:
- Install the appropriate SDK: Add the provider’s current iOS, Android, React Native, Flutter, or other supported package using the recommended package manager or installation method.
- Configure the app: Add required application IDs, publishable keys, merchant identifiers, URL schemes, permissions, or other provider-specific settings.
- Initialize the SDK: Load and configure the payment library when required so your app can access its payment components.
- Connect the sandbox environment: Configure development builds to use test credentials and sandbox endpoints.
- Verify platform requirements: Check the SDK’s minimum iOS or Android version, supported development tools, required permissions, and other compatibility requirements.
Always follow the provider’s current SDK documentation rather than an older tutorial or copied code sample. Payment SDKs change over time as providers update security requirements, supported operating systems, authentication flows, and payment methods.
Step 2: Build the mobile checkout interface
A good mobile checkout makes payments fast and intuitive while using the gateway’s secure UI components whenever possible.
You will typically need to:
- Choose the checkout approach: Decide whether to use the provider’s prebuilt payment sheet, individual payment components, or a fully customized interface. Prebuilt components are usually faster to implement and handle more payment and authentication scenarios automatically.
- Add the required payment fields: Collect only the information needed for the transaction, such as card details, billing address, customer name, or email.
- Add supported payment methods: Configure options such as cards, Apple Pay, Google Pay, PayPal, or relevant local payment methods based on what you need and what your gateway supports.
- Display the transaction details clearly: The checkout should show the amount, currency, products or services being purchased, applicable taxes or fees, and any recurring-payment terms before the customer confirms the transaction.
- Handle checkout states: Design clear loading, success, failure, cancellation, and authentication states so customers always know what is happening.
Whenever possible, use the gateway’s prebuilt or secure payment components instead of building card-entry fields from scratch. These components can handle card validation, tokenization, digital wallets, and authentication flows while reducing the amount of sensitive payment data your application directly handles.
Step 3: Tokenize sensitive payment information
In a typical mobile integration, the gateway’s SDK collects the card details and creates the token before your backend receives anything. Your server then uses that token to create or confirm the payment instead of handling the raw card number directly.
Your dev team will typically need to:
- Collect payment details through the gateway SDK: Use the provider’s secure card-entry component or digital-wallet integration rather than passing raw payment information through your own API.
- Generate a payment token: Call the SDK’s tokenization function after the customer submits valid payment information.
- Send only the token to your backend: Pass the resulting token or payment-method identifier to your server together with the information needed to process the transaction.
- Handle tokenization errors: Account for invalid card details, expired cards, SDK failures, network problems, and customers abandoning the payment flow.
- Treat tokens according to their intended use: Some tokens are single-use, while other providers offer separate mechanisms for storing a payment method for future purchases or recurring billing.
- Avoid logging sensitive information: Make sure application logs, analytics tools, crash reports, and debugging systems do not capture full card numbers, CVVs, or other sensitive authentication data.
Step 4: Send the payment request through your backend
Once the app has a payment token or payment-method identifier, send it to your backend server, which should create or confirm the payment with the gateway or processor.
To do this, you’ll have to:
- Create a payment endpoint: Build a secure backend endpoint that receives the payment token or payment-method ID from the mobile app.
- Validate the transaction: Confirm the order, amount, currency, customer information, and other relevant transaction details on the server rather than trusting values submitted by the app.
- Add an idempotency key: Assign a unique identifier to each payment attempt so a retry does not accidentally create a second charge.
- Send the request to the provider: Use your server-side API credentials to submit the token, amount, currency, and other required information to the gateway or processor.
- Store the payment identifier: Save the provider’s transaction or payment ID alongside your internal order ID so you can reconcile later status changes, refunds, disputes, and webhook events.
- Return an appropriate response to the app: Tell the mobile client whether the payment succeeded, failed, requires additional customer authentication, or is still processing.
Do not trust the mobile app to determine the final amount to charge. A user can potentially modify client-side data, so your backend should calculate or verify the amount against your own product, order, tax, discount, and pricing records before sending the payment request. Secret gateway credentials should also exist only on the server, not inside the app.
Step 5: Configure authentication and fraud controls
Payment authentication and fraud controls help you verify legitimate customers without creating unnecessary checkout friction. Your gateway or processor may provide tools such as 3D Secure (3DS), card verification checks, velocity rules, device signals, risk scoring, and transaction filters.
The goal is to combine these controls so higher-risk transactions receive additional scrutiny while low-risk payments can proceed with minimal interruption.
Your development team will typically need to:
- Enable 3D Secure when appropriate: Configure 3DS authentication for supported card payments, especially where Strong Customer Authentication (SCA) requirements apply (or your processor recommends additional verification).
- Configure AVS and CVV checks: Use address and card-security-code verification where supported to identify mismatches that may indicate higher fraud risk.
- Set fraud rules: Configure controls for factors such as unusually large transactions, repeated failed attempts, suspicious IP or device activity, and excessive transaction velocity.
- Define how risk decisions are handled: Decide when transactions should be approved, declined, blocked, or sent for additional authentication or manual review.
- Test authentication scenarios: Verify that your app correctly handles successful authentication, failed challenges, customer cancellations, timeouts, and payments that require additional action.
Avoid making your fraud rules so strict that they block large numbers of legitimate customers. Start with the gateway’s recommended baseline controls and adjust them using your own transaction and fraud data over time.
Step 6: Set up webhooks
Webhooks let your backend receive payment updates directly from the gateway or processor when a transaction changes status. They are especially important for payments that are not completed instantly, because the status shown immediately after checkout may later change due to authentication, delayed processing, refunds, disputes, or other events.
At this stage, you’ll want to:
- Create a webhook endpoint: Add a secure HTTPS endpoint on your backend that can receive event notifications from the payment provider.
- Subscribe to relevant events: At minimum, monitor events related to successful payments, failed payments, refunds, cancellations, and other status changes your app needs to track.
- Verify webhook authenticity: Validate the provider’s webhook signature or other verification mechanism before trusting or processing an incoming event.
- Match events to internal records: Use the gateway’s payment or transaction ID to connect each webhook event to the corresponding order or payment record in your database.
- Make webhook processing idempotent: Store event IDs or otherwise detect duplicates so the same webhook does not trigger fulfillment, refunds, notifications, or database updates more than once.
Do not rely solely on the payment result returned to the mobile app. For example, Square sends webhook notifications to a configured HTTPS endpoint and requires applications to acknowledge them with a 2xx response. Square also warns that webhook notifications can be delivered more than once and recommends using each event’s unique event_id to avoid processing duplicates.
Step 7: Test everything in the sandbox
Sandbox testing lets you simulate transactions and verify how your app, backend, gateway, authentication flows, and webhooks behave across both successful and unsuccessful scenarios.
Your development team should test:
- Successful payments: Confirm that valid transactions move through checkout, authorization, backend processing, and order confirmation correctly.
- Declined payments: Test insufficient funds, generic declines, expired cards, invalid card details, and other failure scenarios supported by the gateway.
- Authentication flows: Test payments that trigger 3D Secure or other customer-verification challenges, including successful, failed, and abandoned authentication.
- Retries and duplicate requests: Simulate network interruptions and repeated payment submissions to confirm your idempotency controls prevent duplicate charges.
- Webhook events: Verify that successful payments, failures, refunds, cancellations, and other important events update the correct transaction in your database.
- Delayed or pending payments: Make sure your app does not incorrectly treat a pending transaction as successful or failed before a final status arrives.
- Refunds and cancellations: Test full and partial refunds, voids, and cancellations if your application supports them.
- Different devices and network conditions: Test supported iOS and Android versions, slow or interrupted connections, app backgrounding, and customers closing the app during payment.
- Different payment methods: Run separate tests for cards, Apple Pay, Google Pay, and any other methods enabled in your checkout.
Your sandbox test plan should deliberately reproduce edge cases and confirm that the backend maintains the correct payment and order state regardless of what happens in the mobile app.
Step 8: Complete compliance and production setup
Before going live, move the integration from test mode into a production-ready configuration and verify that your payment architecture meets the applicable security and compliance requirements.
For card payments, PCI DSS applies to organizations that store, process, or transmit cardholder data or can affect the security of the cardholder data environment. Your exact compliance scope depends on how payment data moves through your app, backend, and gateway.
Your development and payments teams will typically need to:
- Confirm your PCI DSS responsibilities: Determine which systems fall within PCI scope and which validation requirements apply to your specific integration and merchant setup.
- Switch to production credentials: Replace sandbox keys, merchant IDs, endpoints, and other test configuration with production values.
- Configure production webhooks: Register the live webhook endpoint, add the production signing secret or verification credentials, and confirm that events can be received and authenticated correctly.
- Review data handling: Make sure your app, backend, logs, analytics tools, and monitoring systems do not unnecessarily store or expose cardholder data. PCI DSS prohibits storing card verification codes after authorization.
- Verify security controls: Confirm TLS configuration, access controls, authentication requirements, fraud rules, rate limits, secret management, and any other protections required by your gateway or acquiring bank.
- Complete merchant-side approvals: Finish any outstanding underwriting, compliance reviews, payment-method activation, 3D Secure configuration, or acquiring-bank requirements before enabling live processing.
- Verify app-store requirements: Confirm that your production payment flow complies with the current Apple App Store and Google Play rules for the type of goods or services your app sells.
Do not assume that using a third-party gateway automatically makes the entire integration PCI compliant. PCI SSC specifically notes that software developed to facilitate merchant payment acceptance can still be subject to applicable PCI requirements, even when the customer enters payment information on their own device.
Your gateway, acquirer, or qualified PCI professional can help determine the exact validation requirements for your architecture before launch.
Common mistakes and challenges dev teams encounter during mobile app payment gateway integrations
Even when a payment gateway provides well-documented SDKs and APIs, mobile payment integrations can fail in ways that are difficult to reproduce.
Many problems come from the architecture around the gateway rather than the gateway itself — especially how your app and backend divide responsibilities, handle retries, synchronize transaction states, and respond to unusual payment outcomes.
1. Putting too much payment logic in the app
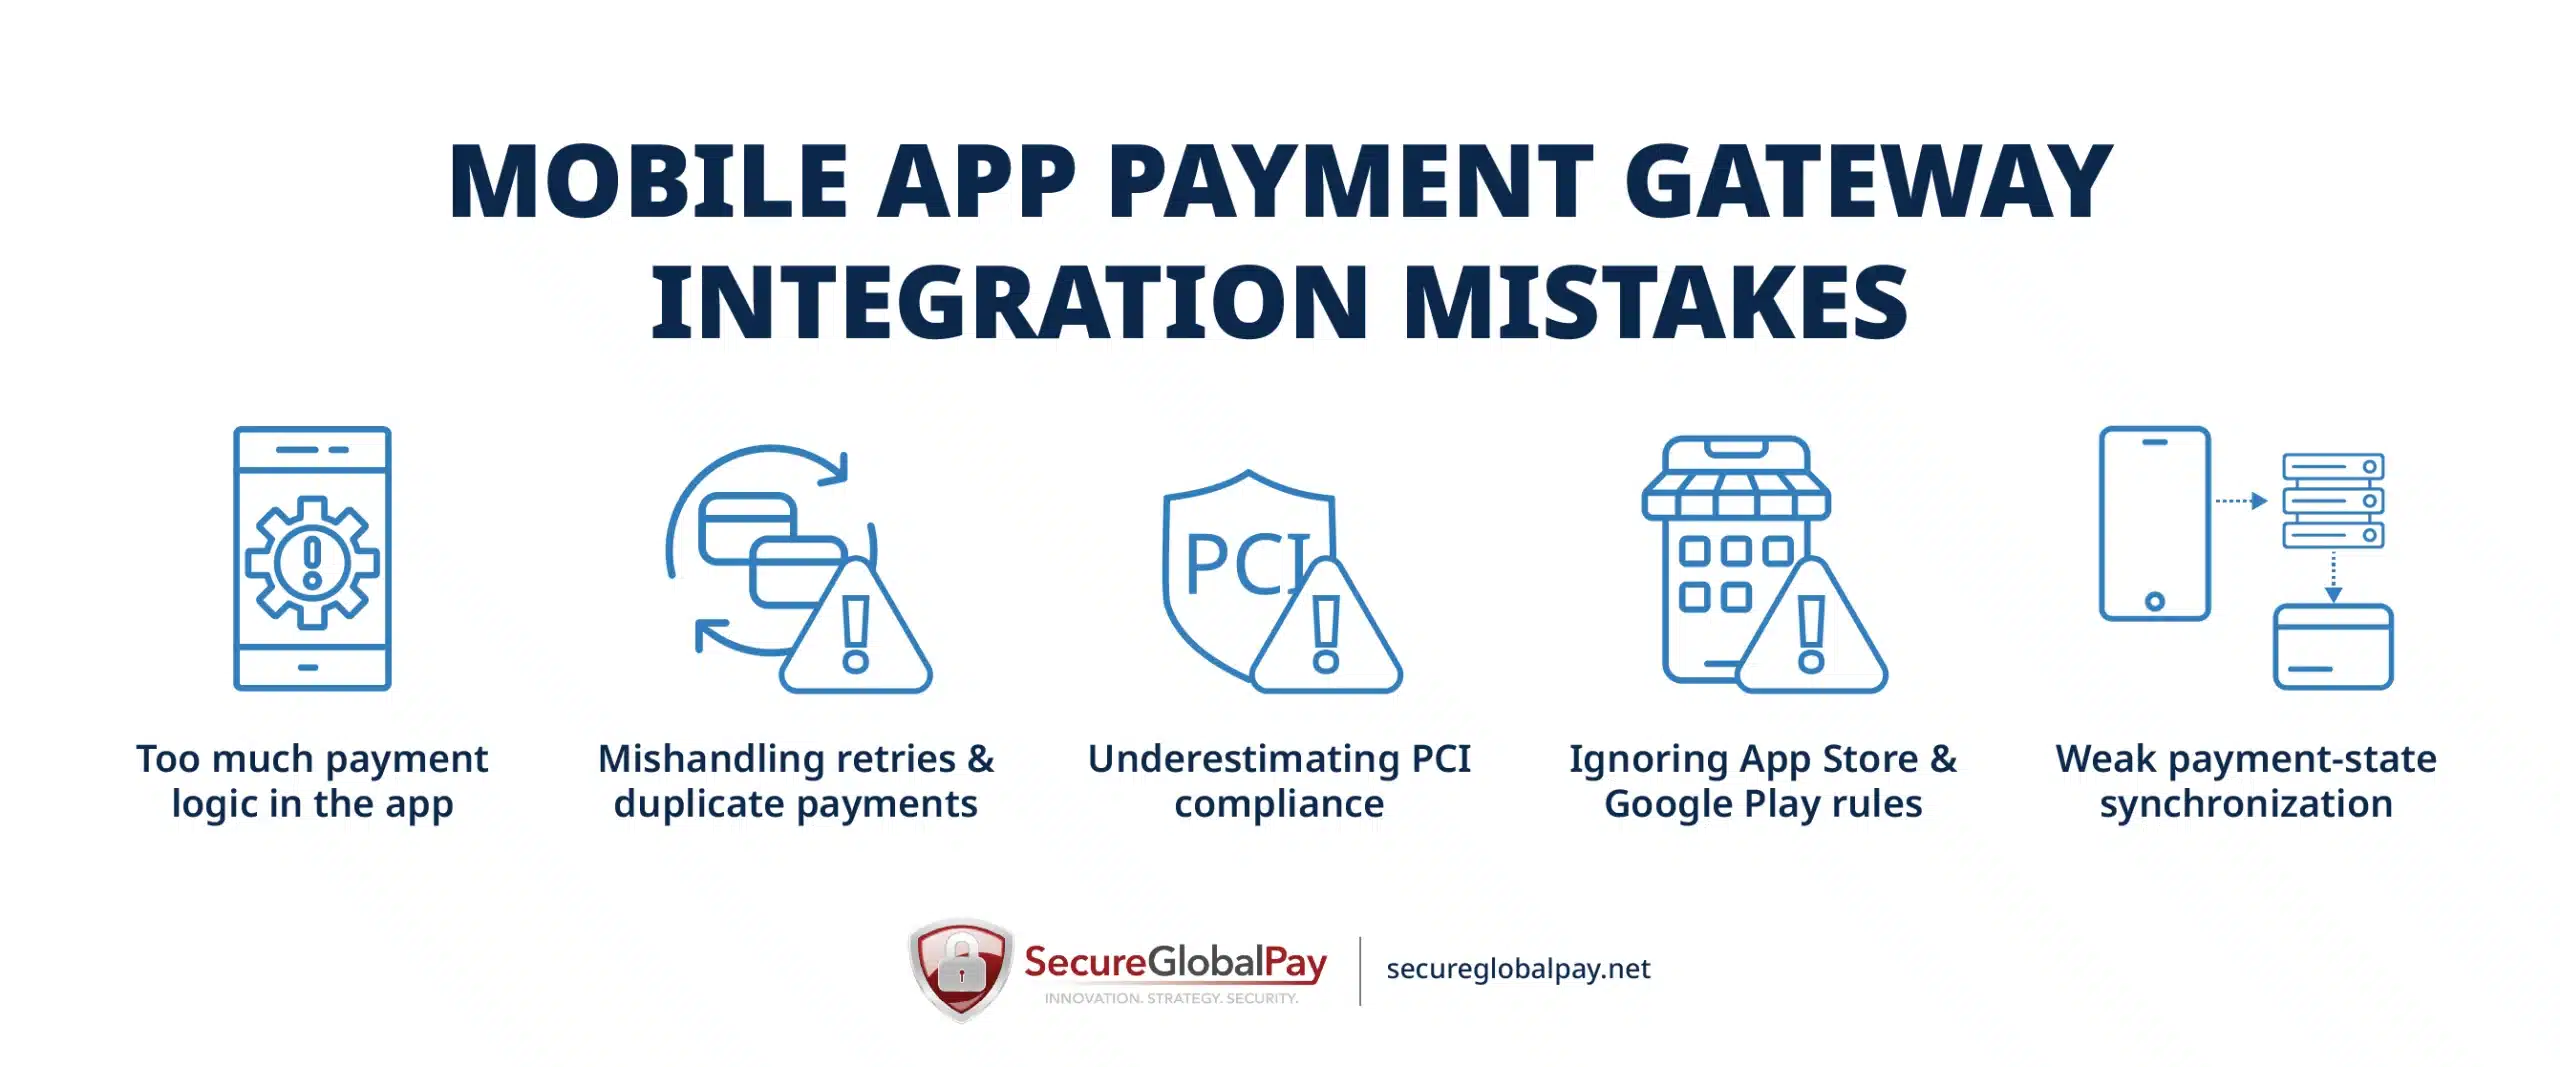
A mobile app should never be treated as a trusted environment. If your app determines transaction amounts, stores secret API credentials, makes privileged payment decisions, or directly controls whether an order is considered paid, an attacker may be able to manipulate that logic by inspecting or modifying the application.
The solution is to keep sensitive payment logic on your backend. Your mobile app should primarily collect customer input, invoke the gateway’s secure payment components, and display the resulting payment state.
2. Mishandling retries and duplicate payments
Mobile payments often fail in ambiguous ways. A customer may tap the payment button twice, lose connectivity after submitting the transaction, or retry because the app never received a confirmation. If your backend creates a new payment for every request, the same purchase can be charged more than once.
The key principle to follow is actually rather simple: never assume that “no response” means “no payment.” Check the transaction state first, then retry only when you know a new payment request is actually required.
3. Underestimating PCI compliance
A common mistake is treating PCI compliance as a checklist to complete just before launch. PCI requirements should influence the architecture from the beginning, because choices such as where card data is collected and whether it ever reaches your backend can significantly affect the amount of compliance work your team must perform.
4. Ignoring App Store and Google Play payment rules
A technically valid payment gateway integration can still create problems if it conflicts with Apple App Store or Google Play billing rules. This matters most when your app sells digital goods, subscriptions, premium features, or content consumed inside the app.
The rules differ by platform, product type, and user location, and both Apple and Google now allow alternative billing or external purchase options in some markets under specific programs and conditions.
Make sure to check platform billing requirements before you finalize the payment architecture, rather than after the gateway integration is complete.
Do not assume that integrating Stripe, SecureGlobalPay, or another gateway means you are automatically allowed to use it for every in-app purchase. First determine what you are selling, where the customer is located, and which Apple or Google billing rules apply to that transaction.
5. Weak payment-state synchronization
A payment can move through several states after the customer taps “Pay,” including processing, requires action, succeeded, failed, canceled, refunded, or disputed.
Problems appear when the mobile app, backend, and payment provider do not agree on the current state. For example, the app may show a timeout even though the charge succeeded, or your backend may mark an order as paid before the final webhook arrives.
You can avoid this issue by making your backend the single source of truth for payment status and reconciling it against gateway responses and webhooks.
In other words, your backend should use transaction IDs, event IDs, timestamps, and defined state-transition rules to determine the correct final status before triggering fulfillment, refunds, or customer notifications.
Simplify mobile payment gateway integration by partnering with SecureGlobalPay
SecureGlobalPay is a full-service merchant services provider that can provide both the merchant account needed to process payments and a robust payment gateway used to connect your mobile app to the payment network.
Here are some benefits of integrating our payment gateway into your mobile application:
- Modern gateway with API access: Developers get API access, gateway documentation, a sandbox environment, and integration support for connecting payment functionality to their app or platform.
- Hands-on integration support: Our dev team can help you troubleshoot issues and help develop custom integrations.
- Numerous payment methods: The gateway also supports multiple payment channels and methods, including cards, Apple Pay, Google Pay, ACH, eChecks, crypto, and more.
- Flexible SDKs: Native Payment Device SDKs support EMV, contactless, and magnetic-stripe card-present transactions. Dedicated Tap to Pay integrations for iPhone and Android allow compatible phones to accept contactless cards and wallets without an external reader, while mobile SDKs can also integrate with supported external card readers.
- Support for high-risk business models: SecureGlobalPay specializes in high-risk industries. This can be particularly useful if the app serves industries such as travel, ticketing, subscriptions, nutraceuticals, adult services, or other higher-risk verticals.
- Residual income for referrals: If you are a developer, agency, or software company referring merchants to SecureGlobalPay, our SaaS partner program offers several compensation structures, including ongoing residual income for the life of referred accounts.
- Multi-MID support and transaction routing: High-volume businesses can manage multiple merchant accounts from one gateway and use intelligent transaction routing and load balancing to stay under approved thresholds.
- Built-in security and fraud tools: SecureGlobalPay’s gateway is PCI-compliant and includes tokenization, point-to-point encryption, AVS, two-factor authentication, fraud detection, and over 200 pre-built integrations with a diverse set of business tools.
Planning to integrate payments into your mobile app or platform? Check out our integration portal or jump on a call to discuss your plans and requirements.
Written by Roland G. Szasz - Director of Business Development - 25+ years in payment processing.
Roland has spent nearly three decades helping businesses navigate the complexities of payment processing. He now works closely with high-risk merchants that have been declined or restricted by conventional providers - and shares his experience and best practices on this blog.

Posted in - Mobile Payment Processing, Payment Gateways
Tailored payment solutions for high-risk merchants
- Domestic and offshore accounts
- Competitive, interchange plus pricing
- No long-term contracts or hidden fees
- Built in fraud protection
- Dedicated account manager; 24/7
Sign up in 5 minutes

A+ Rating
as of 06/17/26